Showing posts with label ornaments. Show all posts

Monday, April 18, 2022

Christmas 2021

Season's Greetings! (Not sure which season, but sure.)

I recently shared our family ornament from 2020, and here's the one we made for 2021:


Jo and Micah both got really involved in helping with this one. I cut the wire and counted out the correct number of wooden beads, and they both strung all the beads on. Then I shaped them into wreaths and the kids did most of the painting. Once everything dried, Jo helped with the ribbons, cutting the ends where they were too long. It's fun to see them be able to be more involved as they get older.

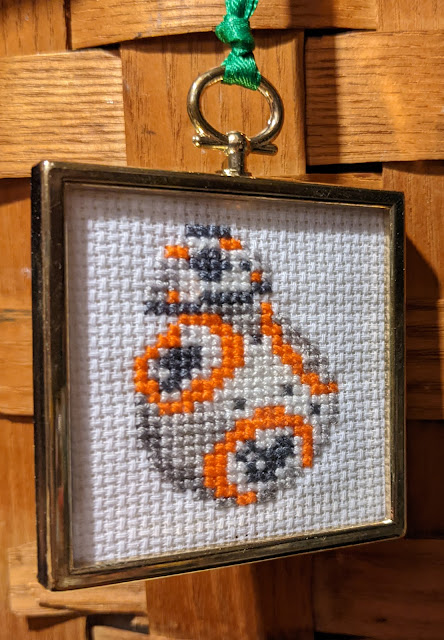
Micah is obsessed with Star Wars this year. He has now seen some of the Lego Star Wars cartoons, but he was obsessed when all he had was the Star Wars Block book. He absolutely loves BB-8, or, as he calls him, Baby 8. I commissioned Caleb's sister to crochet one from a cute pattern we found, and it turned out fabulous - only at least 8" tall - a bit too big for a tree ornament! But perfect for a stuffed "animal". Micah loves to carry around his "ornament Baby-8" and love on him. And I stitched this up in a couple days to serve as his actual tree ornament from the year:
I am particularly proud of Jo's ornament this year. She has been into fairies and magic all year, so making a little fairy made sense. I found some reference images on Pinterest/Etsy, but didn't love any of them as they were - bits and pieces of them needed to be mixed together. (See: idea 1, idea 2, idea 3)

I had a craft weekend event at church, and just brought most of my craft supplies - embroidery floss, pipe cleaners, ribbon, hot glue, glitter, etc. I also had purchased several fake flowers from the dollar store just for this project - the blue petals with the darker edges came that way, which was super nice! From Hobby Lobby, I had purchased a set of wood doll pins and these amazing wings (they really make the project that much better!).

I took several hours to make this, just playing around, and I am so happy with how she turned out! My sister made the fairy wand, which completes her perfectly!


Love and Glitter,
Leah Joy

Monday, March 21, 2022

Christmas 2020 - yep

Okay, we all already know I was quite far behind in this blog, so enough ado already about how late this post is.

For Christmas 2020, Jo and I made little bells for our en masse ornament. (See previous years posts here: 2019 2018 2017 2016 2015 2013 2012 2011)

We used small wooden dollhouse flower pots from Hobby Lobby that we painted in all different patterns. After they dried, we strung a jingle bell on the inside and tied a cute bow around the hanging ribbon.


Jo was super into The Princess in Black in 2020, so I painted this ball ornament to be like Princess Magnolia on one side and The Princess in Black on the other side. My sister made the tiara - and it rotates with the ball ornament.

For Micah, I picked up a package of tiny bottle brush trees from the dollar store, along with a construction vehicle also from the dollar store. A little bit of hot glue, some Epsom salts and glitter later, and we have this snowy ornament:


Love and Lights,
Leah Joy

Monday, May 18, 2020

Christmas 2019 Ornaments

Hey, look - I've finally caught up to the most recent Christmas!

I made both of our kids' ornaments this year. Jo is still a Daniel Tiger fan, so this year I improved on last year's design. I ordered a photo print (just from Meijer photo) of Daniel Tiger, then cut it out in a circle. I made a disc of Sculpey clay just slightly larger, poked a hole for a hanger, then baked it. I secured everything together with Mod Podge. Much cuter (and less creepy) than last year's!


Micah loves cars and trucks ("vroom vroom!"), so I embroidered him this adorable felt car.


For our en masse ornament this year, I got Jo involved. I put together Christmas tree bases with yarn, painted popsicle sticks, and wooden stars. Then, over several weeks, we would sit down with a bunch of fun craft supplies and she'd decorate the trees. I helped with some of the gluing, but everything got put right where she wanted. (With the exception of the one on the top right below - that one was my idea.)


Why, yes, my four-year-old does know the correct order for the rainbow - and will correct you if you say it wrong. :)

Love and Sequins,
Leah Joy

Monday, May 11, 2020

Christmas 2018 (yep) Ornaments

For Christmas 2018, I didn't make quite as many gift as I usually do, and those I did make were mostly 'spa' type gift (bath salts, sugar scrubs, etc.) - nice gifts, but not worth photographing and documenting. I did, however, make this awesome sweatshirt for my sister. I'm super proud of it, because I did that all with freezer paper stencils I cut out by hand!


I usually apply fabric paint with a brush or sponge, but this time, I chose to use fabric spray paint for more even coverage, and it was very worth it! It looks professional, in my unbiased opinion! :)

I also made the mass ornament. This year I went very simple and classic. I made these in a variety of Christmassy color combinations.


As this was Micah's first Christmas, I decided to stick with the idea we did for Jo's first Christmas ornament and choose something Delft. I picked up this adorable bell ornament at a shop in Holland, MI.


Jo was very into Daniel Tiger in 2018, so I really wanted to make a DT ornament for her. (Yep, that's what we call him around here.) I printed out a full-color picture of him, cut out just his face (and ears), and Mod Podged it into a clear plastic ball ornament. Once that was dry, I covered the inside of the ornament with red paint. The idea was that this would be a simple way to make a cute Daniel Tiger ornament. The result?


It's not terrible, but apparently I didn't apply the Mod Podge as thoroughly as I thought, because the red paint started to leak in around the edges of Daniel's face. Oh well. Jo loved it. :)

Love and Mod Podge,
Leah Joy

Monday, April 27, 2020

Christmas 2017 Ornaments

Aren't these snowmen adorable?!


These were the ones I made en masse to gift to friends and family.


And this is the one I made for Jo for 2017. I purchased a clear plastic ball ornament and filled it with Mod Podge inside for the red glitter to stick to. I first drew Elmo's face with Sharpie and then painted over it with acrylic paint. I sealed the face with more Mod Podge.


Jo loved this ornament. She would carry it around with her and read books to it. (This is why I made it with a plastic ornament, not glass!)

Love and Paint,
Leah Joy

Monday, March 13, 2017

Christmas Ornaments: 2016

So, I'm a little late getting all the Christmas posts up this year, seeing as it's about time to post pictures of tulips, but I still wanted to share a few things from this past December.

Here's our mantel this year, complete with the stockings I made, my tree collection, and a playpen. :)


Caleb's parents have a tradition of giving each child an ornament each year. We've decided to adopt that tradition for our family, too.  For Jo's 2016 ornament, I made this little felt strawberry (actually about the size of my fist, so not that little).


We also had not yet gotten her a 2015 ornament (for her first Christmas), so when we went to Bronner's Christmas Wonderland (in Frankenmuth, MI) this fall, we looked for one. I knew what I wanted it to look like, and none of the traditional 1st Christmas ornaments were really looking right to me. Instead, we picked up this beautiful silver and blue ball ornament, and I added a tag with blue cardstock and a silver Sharpie. :)


I also made an ornament en masse to give away to our friends and family.  This year, I made these little felt cupcakes:


They were very time consuming, considering I made almost 30 of them, but they turned out really adorable!


Love and Cupcakes,
Leah Joy

Monday, December 28, 2015

Ornaments 2015

*Just so everyone knows, most (if not all) of these Christmas posts were written in October/November and scheduled to go live now.  I wanted to get these posts written, but wasn't sure how much time I'd have with a newborn.*

Every year growing up, my mom would come up with an ornament that we could produce en masse and add to gifts for friends and family.  There was a wide variety of ornaments over the years, mostly based on our skill level.  We strung Perler beads on pipe cleaners and shaped them into hearts and stars one year, while another year (much later), we strung E beads onto wire and shaped them into stars.  My mom still does this, although my sister is now the only one who participates in the crafting process with her.  When Caleb and I got married, I decided to bring this tradition to our family, too.  You can see my previous ornaments here:  2013    2012   2011  (There's no post for 2014 because I had a really rough autumn/winter and never posted anything.  However, in 2014, I rolled out polymer clay, made impressions of fall leaves, and painted them - mostly following this tutorial.)

For 2015, I decided to sew something, because I've been sewing a lot lately and it's kind of become my new thing.  I found this tutorial for cute little stockings made from scraps, and copied it.  I sewed enough pieces together to be able to cut out 8 stockings at once - enough for 4 ornaments.  I started with pink because I had the most pink scraps, but then did green with some blue, because it's more Christmassy.


I think they turned out really cute! 


A while later, I realized I hadn't made quite enough, so I did another batch of 4 in red.  These ones are really pretty!


And these ornaments inspired my baby quilt!  Once I had my square sewn together, but before I cut out the stocking shapes, I realized that would make a really cool quilt block.  Here's a leftover piece:


Who would think this could inspire a whole quilt? :)

Love and Polka Dots,
Leah Joy

Tuesday, December 17, 2013

Ornaments 2013

I know that last Christmas, I figured I'd be making those miniature mitten ornaments this year.  And I did make one, but I also made one of these paper ornaments from How About Orange.


When I showed the two options to Caleb, he chose the paper spaceship.  So that's what I made this year.  After making a dozen or so green-and-white ones, I realized that with 18 strips of paper, I could do 9 stripes each of 2 colors, or I could do 3 stripes each of 6 colors. (Huzzah for math!)  You know what that means: rainbows!


I made just over 30 of these ornaments.  Most of them are either rainbow or green-and-white, but there are a couple blue-and-white ones and pink-and-white ones, plus one super-special pink-and-blue one (I had leftover paper strips).  They are so easy to make and I could work on them while I watched a show or movie.  

I read some of the comments on the project, so I chose to string an inch of drinking straw inside to help it keep its shape.


It wouldn't be Christmas with Leah without rainbows, right? :)


They really do look like spaceships, though.

Love and Rainbow Spaceships,
Leah Joy

Wednesday, January 16, 2013

"Star" Ornament

For the last two days, I've been sharing about my adventure to pick the perfect ornament.  (Perfect = cute, quick, easy, and pretty cheap)

This is the one on which I settled:


This is the first one I made, intending to make them all in different color schemes, kind of like this pin, but without the letters:


But when I mentioned that idea to Caleb, he thought they should all have a yellow center, because he thought it was supposed to be the Star of David.  So then it was.  I hadn't intended that, but I just went with the same color scheme for all of them.  Simple.

I followed this pattern, but only did the first three rounds:


[I will say that the writer of that blog leaves out a few details.  They're the kinds of things that people who have crocheted before would know, but if you're a brand new beginner, you might not.  (Like joining at the end of the round, for example.)]

Anyway, I work best conveyor-belt-in-a-factory style.  I like to do the same thing over and over.  I began by making a bunch of these:


Then I added the purple:


I first worked all the purple rounds, then wove in all the ends.


Sorry, blurry picture.  They kind of remind me of pogs.

I never took a picture of the whole pile of the finished ones, but they're pretty cute.  And after the first practice one, instead of crocheting a chain to hang it, I just used a length of yarn.  Simpler and cuter.

Here's a finished one attached to a package of truffles:


Not only do they look like the Star of David, but they also look like any ball ornament.  They were quick, easy, cheap, and cute!  (And a stash-buster project!)

Love and Stars,
Leah Joy

Tuesday, January 15, 2013

Ornament Adventures

Check out yesterday's post to see my first ornament attempt.

These all follow in a crochet theme.  Why?  Because I have lots of yarn.  I found most of these on Pinterest.   Here's how they turned out:

The original:


My version:


Awful, I know.  Partly my terrible green yarn, partly the terrible lighting, partly my veering from the pattern since I only had individual round sequins, partly the pattern itself.  Moving on.

The original:


My version:


Not bad, really, and actually pretty cute.  Even cuter than the picture, I think.  However, it took too long to make for it to be practical to make dozens, and it was pretty heavy for an ornament.

The original:


My version:


Looks really cute here, but as I didn't have any plastic rings, I cut a strip of a toilet paper tube.  While it worked, it wasn't very sturdy and would easily be crushed, never to hold its shape again.  And plastic rings aren't the cheapest things in the world.  They're not a bad price, really, but to make dozens and dozens....

The original:


My version:


Okay, freaking adorable.  And then Caleb said that it wasn't very Christmas-y, which is true, but do ornaments have to be?  Anyway, I only made one.  It, too, was a bit heavy.

The original:


My version:


I love this one!  I was actually going to make a combo of these and tomorrow's, but I forgot, so I'll probably do these for this Christmas.  :)


 Here they all are!  I imagine you can deduce for yourself which one I actually made dozens of.  Tune in tomorrow for pictures of that!


I kept them all in a bowl on our kitchen table because... well, why not?  (That's Tim, our clay dinosaur.)

Love and Rainbows,
Leah Joy

Monday, January 14, 2013

Toilet Paper Tube Ornaments

One of my Mom's Christmas traditions is to make an ornament every year to give along with Christmas gifts. We'd make a couple dozen of the same cute ornament and then give them along with the neighbors' tins of goodies, or the gifts to the small group leaders and teachers.  When I moved out and got married, I decided I wanted to carry this on, so last year I made sequined crochet flowers.

This year, I had a dozen different ideas picked out.  I shared them with my mom and she picked hers, and then I tried a bunch from what was left.  Today's "tutorial" shares how one of those ornaments turned out not quite as lovely as I might have hoped.


Toilet paper tube projects are all over Pinterest.  You can make faux cast iron wall hangings, puppets, dolls, bows, boxes, toy cars, and storage caddies.  You can use them for stamping, molding, drawing, and painting.  There are a hundred uses for them.  So when I saw these two pins, I decided to try a version of them.


I cut my toilet paper tubes into strips, then used acrylic craft paints to paint them white.  I'm sure it would have been easier to spray paint (especially if I chose to make dozens of them), but I didn't have white spray paint and it didn't make sense to buy any when I might only be making one.  

For the glitter, I tried a couple different ways.  After all, I have a whole box labeled "glitter"; I have plenty of ways.  While the white paint was still wet, I sprinkled some loose glitter over it, and pressed it in.  Not only did this look terrible, it didn't stick very well.  I also have glitter spray paint, so I tried that, but it didn't coat very evenly, and it tended to coagulate in certain spots.  This first one looks fine, but you can see the second one didn't get as even of a coating.  This was annoying since I painted them all the same way.  Besides, while it's clearly glittery in this picture, it doesn't have quite the glitter-punch I wanted from a normal distance.  I don't think the glitter spray paint will ever get it that far, no matter how many coats I apply.


Finally, I hot glued all the pieces together into a flower.  This part worked just fine. 


But really, it's not that cute or Christmas-y without glitter or red, and it's kind of flimsy, too.


All in all, it was a pretty cheap project to try, since I had all the supplies on hand, and it only wasted an hour or so of my life.  

Tune in tomorrow to see some other ornament attempts!

Love and Glitter,
Leah Joy